Form 0 Natural History: The Garden Mural Project
These eight lesson should take the entire school year, so each lesson will take a few weeks.
Lesson 1: Living and Non-living or The Criteria for Life
- Take a nature walk at least once a week, but as often as possible. A small walk each day, with one longer walk once a week is ideal. As Charlotte Mason herself says,
“It is a mistake to think that a half day is necessary for a field lesson, since a very efficient field trip may be made during the ten or fifteen minutes at recess, if it is well planned.”
For your first Nature Walk, see what interests your student.
- Anyone can tell that a book is not alive, that is true, but it is important to lay the groundwork for the four criteria for life. Go over each of the criteria, one per lesson period, beginning with Living things reproduce. Speak to your student using simple wording and examples. You will be going over this concept again as the student gets older with the language and examples becoming more complex as the student gets older.
- Living things reproduce.
- All life forms contain DNA.
- Living things eat, drink and grow.
- Living things sense things and react to changes in their surroundings, including moving.
- For your student's second nature walk, have your student pick something to include in his journal and have him write a few words in his journal about what he experienced.
- Begin to point out the differences between plants and animals, such as the fact that plants make their own food using water, air and sunshine, whereas animals must eat plants or animals or both.
Lesson 2: Garden Mural Project: Flowers
- Obtain a very large piece of paper or tape several pieces together in order to get a wall-sized mural. Have your student paint the background brown on the lower half for the ground level and blue on the upper half for sky.
- Learn about the parts of flowers while making the blossoms from paper plates and stems, leaves and other parts from colored construction paper.
“All the names should be taught gradually by constant unemphasized use on the part of the teacher; and if the child does not learn the names naturally then do not make him do it unnaturally.”-Handbook of Nature Study, page 456

Sunflowers
- Glue cornmeal to the appropriate part of the paper flower in order to represent pollen.
- Have your student plant sunflower seeds in plastic cups. Have your student observe and sketch the plant's development regularly in his science journal. Be sure to include the dates.
- During at least one of your nature walks, look for some garden flowers in your own yard or neighborhood. Start to use the correct labels for the plant parts that you learned. Give an opportunity for a journal entry.
Lesson 3: Insects/Bees
- What insects live in a particular location? Make a can trap to capture the insects of a particular location, a part of your backyard, for example. Punch holes in the bottom of an empty, clean can. This will make sure that the can does not fill up with water if it rains. Dig a can-sized hole in the location of your choice and place the can in the hole so that its top is at ground level. Put some food for the insects in the can, such as fruit or meat. Cover the top of the can with a board, and put rocks around the edges of the board to life it a few inches from the ground. Check the can regularly and identify the insects that come to your can. Have your student count the number of each type of insect and record all of this in his science journal.
- Learn about the parts of an insect. Lead the student to identify the three body segments common to all insects: head, thorax and abdomen. Most adult insects have wings. Have your student make some aphids out of construction paper and put them on the leaves of the flowers he has made. Study the different mouthparts of insects.
- Have your student make a paper adult butterfly. Fold a piece of construction paper in half. Open the paper and lay it flat on the table. Cut out a butterfly shape. Have student paint details of the butterfly on one side and fold the paper over again. When the butterfly is completed, both sides of the butterfly are exactly the same. They are symmetrical, mirror images of each other. Discuss the concept of symmetry.

- For one of your walks, encourage your child to look for insects. Take an insect field guide with you on a nature walk. Help the student look for and identify insects that you find. What physical characteristics do all insects have in common? Have the student draw a picture of the insect with every feature that makes an insect and insect. Allow the student to refer to the field guide to make an accurate drawing of the insect. Encourage the student to add the natural environment in which the insect was observed. Write any of the student's comments on the page. Learn basic information about insects through various resources (Exploring Creation with Zoology I, by Jeannie Fulbright, chapter 9 is one such resource, or you may find books at the library.)
- Many adult insects have compound eyes. Compound eyes are made up of thousands of tiny separate lenses that work together to complete a picture. Notice the eyes in the insects you find and record on your nature walks.
- All insects have a tough, shell-like outer covering called an exoskeleton. As an insect grows, it sheds or molts one hard shell that is replaced by another. Point this out for observation on your next nature walk.
- Cut out seven circles, nine squares and seven hexagonal shapes out of yellow construction paper. Allow the student to explore which cell shape is the most efficient building block for a beehive. The cells should fit together without wasted space. Lead the student to the conclusion that the hexagon's six-sided shapes are best because they fit the bee's body shape and fit snugly together.
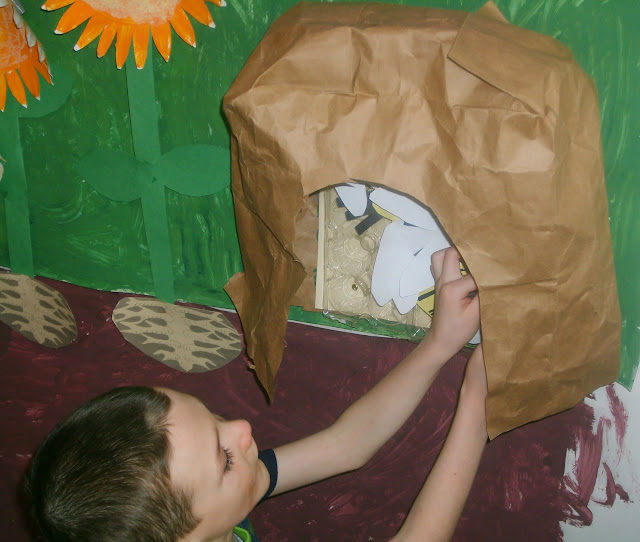
- Have your student make a bee hive out of a paper bag for our mural. Use egg cartons for the honeycomb.
- Talk about bee stings and what is the best behavior for a person near a bee.
- For your next nature walk, focus on your student drawing a sketch in his science journal of a bee or other insect in his science journal.
- Make out of paper and add a Queen Bee and Worker Bees. Review the parts of insects and compare them to the aphids.
- Newly hatched bees work inside the hive first, keeping the hive warm, making wax and feeding the larvae.
- Look at real honeycomb from a jar and taste the honey.

Lesson 4: Insects/Ants and Bees
- Ants and Bees are both social insects. Research and discuss social insects. (Exploring Creation with Zoology I, by Jeannie Fulbright, chapter 11 is one such resource, or you may find books at the library.) Make ants to add to your garden out of black construction paper.
- Have your student write about one species of ant or draw and describe an ant colony in his science journal.
- Buy an ant colony kit or make one in a glass jar. Have the student fill a large glass jar full of dirt and tape dark construction paper around it.
- During one of your nature walks, focus on finding and observing ants. Look for an ant hill, and observe the ants coming and going on the hill. Discuss what they are doing.
- Carefully dig up the ant hill, including the surrounding dirt and place it all in the jar you have prepared. Place wet piece of cotton on the dirt and keep it damp to provide moisture for the ants. The ants may be fed by adding ant food or tiny table scraps twice weekly. Make holes in the lid and secure. To observe the ants, remove the dark paper. Have the student draw a picture of what he sees.
- Most insects have two antennae. The antennae are used to feel and smell and sometimes taste and hear. Ants and bees rely more on their sense of smell than their sight to tell who belongs in their colony. Give everybody in the family (or group of friends) cups with cotton balls - half scented with strawberry extract and half with vanilla extract. The strawberry scent represented the ants and the vanilla represented the bees. Have one student play the role of the sentry bee of the bee hive was responsible for letting in the bees (vanilla scented cotton balls) and stinging the ants (strawberry scented cotton balls).
- Have your student make paper tunnels and chambers and have your student add this to the mural.
- The hungry ants go searching for food and sometimes invade a beehive because they smell the sweet honey. They try to get in to get the honey but the hive's sentry bees won't let them. Your student can act this out with his paper insects.
- The foraging ants can discover aphids on the flowers. Make paper aphids to put on the paper plants. Ants love to get honeydew that the aphids excrete from their bodies, and the aphids like the protection the ants can give.
- When a scout bee finds a good source of nectar, it dances a special figure 8 dance. The more rapid the dance, the nearer the food. The angle of the dance indicates the relationship of the nectar to the sun. Have the student pretend to be a bee that has just found a garden full of flowers containing nectar. Place a picture of a flower somewhere in the room and have the student do a dance of body language to show another student or family member where they can find the flower. Make sure the student knows he cannot point or look at the flower picture.
- Once bees are old enough, they follow the forager bees' instructions to find flowers and gather nectar and pollen. After having your paper bees visit the paper flowers on the mural, add pollen bags (of construction paper) on the back legs of our bees and glue pollen (cornmeal) to them, simulating the pollen they would have picked up from visiting the flowers.
- On one of your nature walks, have the student begin a list in his science journal of all the insects he finds and identifies. He may add to this list each week.
- Give your student the seven hexagons that you made lesson 3. Have him write a fact about bees on each hexagon and then glue the hexagons together in his science journal to make a honeycomb.
- Have your student write about one species of ant or draw and describe an ant colony in his science journal.
- Buy an ant colony kit or make one in a glass jar. Have the student fill a large glass jar full of dirt and tape dark construction paper around it.
- During one of your nature walks, focus on finding and observing ants. Look for an ant hill, and observe the ants coming and going on the hill. Discuss what they are doing.
- Carefully dig up the ant hill, including the surrounding dirt and place it all in the jar you have prepared. Place wet piece of cotton on the dirt and keep it damp to provide moisture for the ants. The ants may be fed by adding ant food or tiny table scraps twice weekly. Make holes in the lid and secure. To observe the ants, remove the dark paper. Have the student draw a picture of what he sees.
- Have your student make paper tunnels and chambers and have your student add this to the mural.
- The hungry ants go searching for food and sometimes invade a beehive because they smell the sweet honey. They try to get in to get the honey but the hive's sentry bees won't let them.
- The foraging ants can discover aphids on the flowers. Make paper aphids to put on the paper plants. Ants love to get honeydew that the aphids excrete from their bodies, and the aphids like the protection the ants can give.
- On one of your nature walks, have the student begin a list in his science journal of all the insects he finds and identifies. He may add to this list each week.
Lesson 5: Insects/Butterflies and Metamorphosis
- Explain that every insect begins life as an egg. The growth time from egg to adult may vary from a few days to 17 years! Most insects follow one of three patterns of growth and development: simple growth and development, incomplete metamorphosis and complete metamorphosis. Have resources for your student about insect life cycles. (Exploring Creation with Zoology I, by Jeannie Fulbright, chapter 10 is one such resource, or you may find books at the library.)
- Simple Growth and Development: Show pictures of a silverfish and springtail in the field guide. These are wingless insects and they grow and develop in three stages: 1. an adult lays an egg, 2. it hatches and looks like a small adult, 3, it's looks don't change as it grows and molts and it reaches adulthood with almost no change. Look for these insects in your nature walks.
- Incomplete Metamorphosis: Look up grasshoppers, mayflies, roaches, damselflies, dragonflies or cicadas. They go through an incomplete metamorphosis: 1. An adult lays an egg, 2. A nymph that hatches from the egg looks much like the adult but wingless, 3. The adult comes of to the last most with wings. Look for these insects in their various stages on your nature walks.
- Look at pictures of butterflies, moths, beetles, flies, bees, wasps or ants. These insects grown and develop in a complete metamorphosis:
- An adult insect lays an egg,
- A larva hatches that looks completely different from the adult,
- After the larva is grown, it turns into a pupa. '
- The winged adult emerges from the pupa. It appears completely different from earlier stages.
- Make butterflies from construction paper.
- Find resources, read about the Order Lepidoptera and discuss what is learned. (Exploring Creation with Zoology I, by Jeannie Fulbright, chapter 14 is one such resource, or you may find books at the library.)
- On your nature walks, look for moths and butterflies. Begin making your own Insect Field Guide.
- Have your students glue eggs (navy beans) to leaves of the paper flower he has made to represent the adult butterfly laying eggs on the leaves.
- The larva of butterflies are called caterpillars (larvae of flies are called maggots, larvae of beetles are called grubs, larvae of mosquitoes are called wigglers, etc.) Make caterpillars from construction paper.
- The pupa of a butterfly is called a chrysalis. Make an oval pocket to represent the chrysalis out of construction paper. Sponge paint to add texture.
- While your student isn't looking, slip their butterflies into the chrysalis pockets and tape them shut. Let your student help the butterflies emerge from their chrysalis.
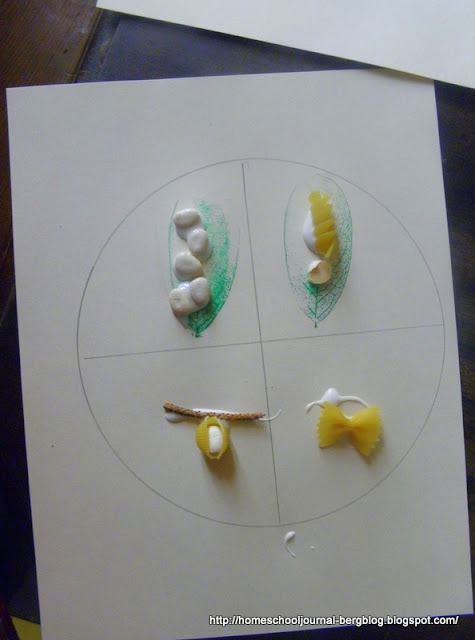
- On a paper plate or piece of paper, have your student draw the arrows of the butterfly's life cycle, leaving a space for the four states between the arrows. Have your student glue dried beans to the plate for the eggs, spiral pasta for the larva, shell pasta for the pupa and bow tie pasta for the adult butterfly. Add leaves, a branch and paint to finish.
- On this week's nature walk, bring along a magnifying glass to look at the insects.
- Optionally, obtain a butterfly raising kit or bring home caterpillars to raise to adulthood. Make sure you know and have access to a supply of the caterpillar's chosen food. If you decide to do this, have your student keep note of observations in his science journal. Entries should be kept most days, noting changes that occur as the larva changes into the chrysalis and then into an adult butterfly. Tell him to draw pictures and record color, shape, size, texture and position of each stage. Encourage him to ask questions.
- Hungry butterflies go right to the flowers to gather nectar. Have your students drink nectar (juice) with probiscus (straws.)
- Learn how butterflies avoid predators. We learned that many butterflies have large circles of color on their wings called "eye spots." They are called that because they look like eyes of a large creature, like an owl, to a bird who might otherwise be a predator to the butterfly. This scares the birds away. Have your student add colored circles to his paper butterfly.

- Compare butterflies and moths. Make a Venn diagram in his science journal. (Butterflies fly during the day, have knobs at the end of their antennae, have thin, hairless bodies, rest with their wings held upright, etc. Moths fly at night, their antennae are not knobbed, have, plump, furry bodies and rest with their wings spread, etc.)
- During one of your nature walk times, instead of a walk, have your student rope off a small square of his backyard to observe what insects can be found in that area. Read One Small Square: Backyard by
Lesson 6: Insects/Helpful and Harmful Insects
- Learn about the damage that insects can do. Loosened some of the tape that held the flowers on the mural, to make them "wilt" to represent the damage that aphids can do.
- Learn about helpful insects. Make paper ladybugs to eat the aphids. Fold a round shaped piece of paper in half and put dots of black paint on one half. Fold over again and the identical spots will appear on the other side. Discuss and perhaps do some activities relating to symmetry.
- On one of your nature walks, look for ladybugs and aphids.
- Discuss and have your student make one list telling how insects are helpful and another telling how they are harmful.
- Read about beetles, flies and true bugs and discuss what is learned. (Exploring Creation with Zoology I, by Jeannie Fulbright, chapter 12 is one such resource, or you may find books at the library.)
- On the next nature walk, take along a picnic to enjoy. See if your student can find a beetle, fly or true bug on the nature walk.
Lesson 7: Spiders

- Teach the difference between an insect and a spider, by counting their legs (8, not 6) and body parts (2, not 3). Make a paper spider to add to your mural.
- On at least one of your nature walks, look for spiders and their webs.
- Look at a variety of spider web designs. Place a sheet of waxed paper over the final web design. Secure the waxed paper to the background with tape. Using liquid glue on the waxed paper, have the student trace the web design. The glue should be in a continuous bead with not spaces. Let the glue dry overnight, Peel away the waxed paper, keeping the web of glue in one piece. Hang the web between two sticks or add it to your mural.

- Have your student select one type of spider to learn about and narrate what he has learned about spiders and you record it in his science notebook. Let him include illustrations. (A good resource for this is chapter 13 of Exploring Creation with Zoology III, by Jeannie Fulbright or you can find resources at your library.)

Habitats, part 4: Adding Isopods to the Terrarium (include your student in this project, if you have older students already doing this.)
- A Ground Spider uses a depression in the ground and, covering the hole with leaves and twigs, traps an unsuspecting insect as it falls through. You may make one of these, using a brad to make a door that can swing back and forth.
- Learn about other arthropods such as scorpions, centipedes, or isopods. (A good resource for this is chapter 2 of Exploring Creation with Zoology III, by Jeannie Fulbright or you can find resources at your library.) What is an arthropod?
Lesson 8: Finishing up Insects and the Mural
- Learn what different insects do in cold weather (migrate, die, live dormant, hibernate, etc.)
- Read about other interesting insects such as Praying Mantises, Dragonflies, Damselflies, Crickets, Grasshoppers, Katydids and Cicadas and discuss what is learned. (Exploring Creation with Zoology I, by Jeannie Fulbright, chapter 13 is one such resource, or you may find books at the library.)
- On at least one of your nature walks, look for Praying Mantises, Dragonflies, Damselflies, Crickets, Grasshoppers, Katydids and Cicadas.
- If your student can find one, capture a cricket, make a habitat for it and count its chirps. Punch holes in the lid of a jar. Find a cricket on a nature walk. Make a home for the cricket by picking plants and gather dirt from the area in which you find the cricket. Set a shallow container of water in the jar. Provide a variety in the cricket's diet with bits of lettuce, apple or oatmeal. Have your student sketch the cricket in his nature or science journal. Have the student count the number of chirps in 15 seconds, add 40 and this is the approximate temperature. Do this several times to get an average. Discuss what an average is. Compare this with the temperature on a thermometer. Record all of this in the science journal. Do this as many times throughout the week as the student is interested. Release the cricket as soon as the activity is over.

- Take another insect nature walk, but this time at night. Compare what you find to what you found during the daytime.
- Your sunflowers' seeds have developed. Glue sunflower seeds to the paper flowers in your mural.
- Take a picture of your student with his completed mural.


