Physical vs. Chemical Change
The question this week we strove to solve was how to tell the difference between a physical and a chemical change. In a physical change, the characteristics might change, but the molecular structure hasn't. The best way to teach this is through examples. And lots of them. Because the molecular structure has not changed, often with a physical change, you can change the item back without too much trouble...but not always...
The Egg Experiments
 First we broke open an egg...
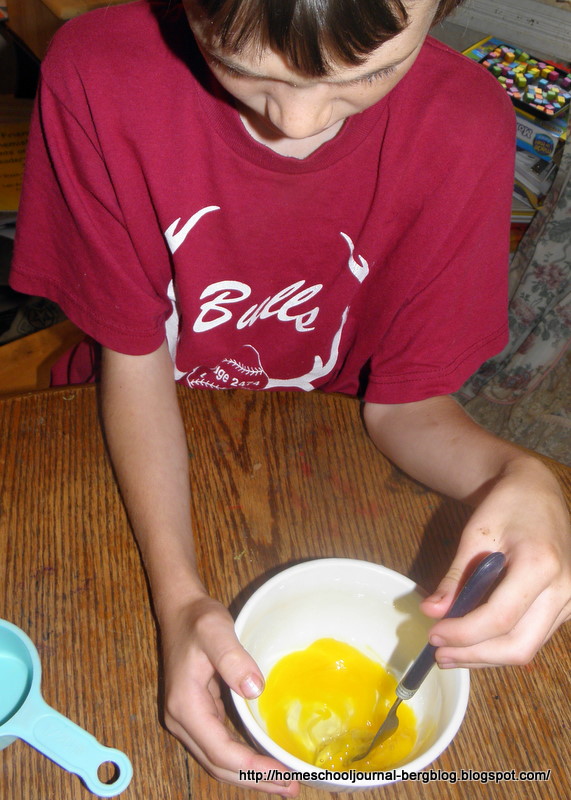 and stirred it up.
Chemical or physical change?
Even though it might look different, it has not gone through a chemical change; it's only physical.
However, if you take an egg (in the shell) and put it in an acid such as toilet bowl cleaner or vinegar, the egg will eventually lose it's shell altogether. If you use vinegar, it will take several days to a week. If you use toilet bowl cleaner, it will take much less time, but cannot be handled without gloves.
 |
| As soon as the egg hit the vinegar, it began to have bubbles form on its surface, and only minutes later the eggshell started dissolving, creating a foam. Here it is a week later, and the froth from the calcium from the eggshell has gathered at the top. . |
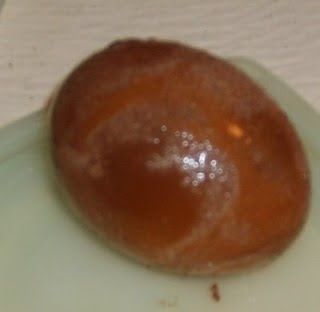 |
| It is hard to tell from the photo, but the shell has disappeared and it is soft to touch. |
The Water Experiment
 How about water?
Take any measurement of water you wish. It doesn't really matter how much, as long as you can see the measurement.
As you can see, it is just a hair above the line in this cup. Now, put it in the freezer until it turns solidly into ice. I don't know if you can tell by the photograph, but the ice has increased in volume slightly, and now is nearly to the next line. If you try it yourself, it will be easier to see.
This, being part of a phase change, is a physical change. (More about phase changes later.)
The Hydrogen Peroxide-Yeast Experiment
BEWARE: This next one is messy. (It is sometimes called Elephant Toothpaste. It is also experiment 14.2 in Exploring Creation with Chemistry)
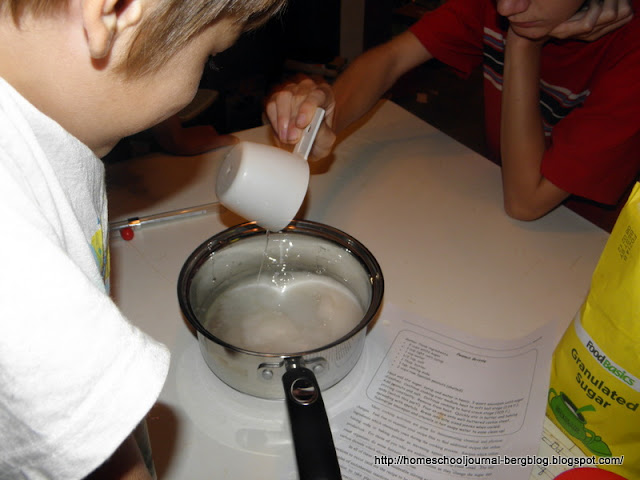
Pour into an empty water bottle 4 oz of hydrogen peroxide and 2oz of liquid dish soap... and a few drops of food coloring.
 In a separate container, mix one packet of active yeast with some warm water, and let sit for 5 minutes.
When you are ready, pour the yeast mixture into the soda bottle through a funnel and watch the reaction!
It is more fun than the baking soda and vinegar reaction (but more on that later.)
 The hydrogen peroxide has in it, among other things, oxygen molecules (hence the oxide part). When you add yeast to the hydrogen peroxide, it acts as a catalyst.A catalyst speeds up the reaction rate by lowering the energy level needed for the reaction. In this case, the yeast, acting as a catalyst, sped up the otherwise slow decomposition of the hydrogen peroxide, so that the peroxide molecule released its oxygen atoms faster that it otherwise would.
 The dish soap is added so that the bubbles of released oxygen hold together into a foam.
 Our next demonstration also has to do with yeast. We made Tiger Bread (sometimes called Dutch Crunch Bread), which is especially interesting bread to do as part of science because it has yeast action twice.
 The tiny yeast organisms do some fantastic chemical reactions as they change the sugar into carbon dioxide, which allows the bread to rise.
I don't know if you can tell by the photograph, but the ice has increased in volume slightly, and now is nearly to the next line. If you try it yourself, it will be easier to see.This, being part of a phase change, is a physical change. (More about phase changes later.)
The Hydrogen Peroxide-Yeast Experiment
BEWARE: This next one is messy. (It is sometimes called Elephant Toothpaste. It is also experiment 14.2 in Exploring Creation with Chemistry)
Pour into an empty water bottle 4 oz of hydrogen peroxide and 2oz of liquid dish soap...
and a few drops of food coloring.In a separate container, mix one packet of active yeast with some warm water, and let sit for 5 minutes.When you are ready, pour the yeast mixture into the soda bottle through a funnel and watch the reaction!
It is more fun than the baking soda and vinegar reaction (but more on that later.)
 The hydrogen peroxide has in it, among other things, oxygen molecules (hence the oxide part). When you add yeast to the hydrogen peroxide, it acts as a catalyst.A catalyst speeds up the reaction rate by lowering the energy level needed for the reaction. In this case, the yeast, acting as a catalyst, sped up the otherwise slow decomposition of the hydrogen peroxide, so that the peroxide molecule released its oxygen atoms faster that it otherwise would.The dish soap is added so that the bubbles of released oxygen hold together into a foam.
For your older students, the formula is-
2H2 O2 (aq) turn into 2H2 O (l) + O2(g).
(Sorry, I can't figure out my subscripting, etc.)
More about Catalysts and Enzymes at Layers of Learning.
The Growing Yeast Experiment
Our next demonstration also has to do with yeast. We made Tiger Bread (sometimes called Dutch Crunch Bread), which is especially interesting bread to do as part of science because it has yeast action twice.
2 1/2 tsp active dry yeast (1 packet or 1/4 ounce)
1/4 cup warm water (105-110F)
1 cup warm milk (105-110F)
1 tbsp sugar
2 tsp vegetable oil
1 1/2 tsp salt
2 1/2 - 3 1/2 cups all purpose flour
(Topping)1 tbsp active dry yeast
1/2 cup warm water (105-110F)
1 tbsp sugar
1 tbsp vegetable oil
1/4 tsp salt
3/4 cup white rice flour (not sweet rice flour)
In the bowl of an electric mixer, combine yeast, water, milk and sugar. Stir to dissolve and let sit for about 5 minutes. Add in vegetable oil, salt and about 2 cups of flour. Using the dough hook attachment, mix at medium speed until the dough comes together. Add remaining flour a tablespoon or two at a time until the dough pulls away from the sides of the bowl.  Turn out onto a lightly floured surface and knead for about 4 minutes, until smooth and elastic. Place in a lightly greased by and cover with plastic wrap. Let rise for 1 hour, or until doubled in size. Once the dough has risen, turn it out onto a lightly floured surface and divide it into 6 equal portions. Shape each into a ball and place on a parchment-lined baking sheet. Let rise for 15 minutes while you prepare the topping.
Turn out onto a lightly floured surface and knead for about 4 minutes, until smooth and elastic. Place in a lightly greased by and cover with plastic wrap. Let rise for 1 hour, or until doubled in size. Once the dough has risen, turn it out onto a lightly floured surface and divide it into 6 equal portions. Shape each into a ball and place on a parchment-lined baking sheet. Let rise for 15 minutes while you prepare the topping.
Combine all topping ingredients in a medium bowl and mix very well. Let stand for 15 minutes. Once the rolls have risen a bit and the topping is ready, spread a generous layer on the rolls, trying to use all the topping in a thick coat on the top and sides. Let rise for another 20 minutes. Bake at 375F for 25-30 minutes, until well browned.
The tiny yeast organisms do some fantastic chemical reactions as they change the sugar into carbon dioxide, which allows the bread to rise.
The Peanut Brittle Experiment
 This next experiment comes from Friendly Chemistry and shows physical and chemical changes. Talk about how the ingredients look before, during and after cooking.
 Once cooled, break into bite-sized pieces.
 The idea for the next experiment comes from Michelle at Delightful Learning and involves root beer floats.
For more similar experiments, check out the stuff Sadie at It's a Boy's Life does.
 This next experiment comes from Friendly Chemistry and shows physical and chemical changes. Talk about how the ingredients look before, during and after cooking.
2 cups white sugar
1 cup light corn syrup
1 cup water
1/2 tsp. salt
1 Tab. butter
1 tsp. baking soda
2 cups peanuts (raw Spanish are the best, but others will work)
Butter a cookie sheet well.
Heat and stir sugar, syrup and water in a heavy 3 quart saucepan until sugar dissolves. Continue cooking over medium heat to a soft ball stage (235 degrees). Add peanuts and salt. Continue cooking to a hard crack stage (305 degrees), stirring constantly. This will take some time.  Remove from heat. Quickly stir in butter and baking soda.
Remove from heat. Quickly stir in butter and baking soda.
(Make sure you students see this part.) 
Pour at once onto the well-buttered baking sheet, spreading with a spatula. Submerge saucepan and utensils in hot soapy water immediately to ease clean up.
Once cooled, break into bite-sized pieces.
There were some physical changes such as butter and sugar melting and some chemical changes as evidenced by the thickening as the mixture heated. I neglected, however, to take a picture of the mixture before the baking soda was added so that you could see the dramatic chemical change that occurs when the baking soda is added.
The Root Beer Float Experiment
The idea for the next experiment comes from Michelle at Delightful Learning and involves root beer floats.
Take one glass and put a generous scoop of ice cream in it. In the other glass, fill it half full of root beer.
You can get predictions, if you wish, about what the differences will be when you finish off these floats. Will they look the same, and if not, what will be the differences? When the ice cream is added to the soda it doesn't create as many bubbles as when the soda was added to the ice cream.
In either case, when the ice cream and the root beer meet, the gas trapped in the root beer is released into a lovely bubble foam.
When the ice cream is added to the soda it doesn't create as many bubbles as when the soda was added to the ice cream.In either case, when the ice cream and the root beer meet, the gas trapped in the root beer is released into a lovely bubble foam.
A lovely physical change.
It's basically the same as what is going on with the Mentos and soda experiment, (which you could also do as an experiment) except the root beer experiment is not as messy (and more delicious.) You are knocking the carbon dioxide in the soda out of solution. Bubbles of carbon dioxide do something called nucleation shortly after the pressure is released from a container of carbonated liquid. Nucleation is a reaction which occurs when components in a solution start to precipitate out, forming nuclei which attract more precipitate. Nucleation often occurs more easily at a pre-existing interface (a point of interaction between two systems) such as the ice cream. Some ingredients in the ice cream lower the surface tension of the soda so the gas bubbles can expand, while other ingredients trap the bubbles in much the same way as small amounts of protein in seawater trap air to form seafoam.
So, when the ice cream is added to the soda, the soda had time to release most of the carbon dioxide into the air before the ice cream was added, but when the soda was added to the ice cream, the ice cream provides nucleation sites around which the carbon dioxide bubbles could form and grow.
For more similar experiments, check out the stuff Sadie at It's a Boy's Life does.

